Pages

Saturday, November 29, 2014

Do we only practice the Manly Skills?

           I think we as men tend to overlook allot of skills very necessary to true Self-Reliance. Looking back in time to Otzi the Iceman's Kit, what would it take to re-make those items? There are plenty of testosterone based skills within his kit for sure, Flint Knapping, Hide Tanning, Copper Smelting, And Bow making Oh yeah!!! But to keep him alive and carry his gear took skills much less appealing to most of us. His Clothing was sewn together, his pack frame lashed together, and he had several woven items as well. There is no evidence that Otzi had a little cave women at home to make these things for him, so we can only assume that he made them himself. While many skills we practice today are important to both short term and long term survival, the less romantic skills are just as often more critical especially in the longer term. The ability to manufacture items of clothing, devices for carrying other items as well as repairing items that become damaged like clothing is surely important to being self reliant even in the modern day. I have been immersing myself in weaving lately in many forms and this epiphany really came from closely looking at Otzi's personal kit on a deeper level.

Otzi's Knife sheath is one example of a woven object he carried to secure equipment

This is my attempt at a similar weave to create a knife sheath for a stone blade
Otzi did not use complicated weaving techniques to make the items he had but this skill has been around for a few thousand years none the less. As I delve deeper into this skill it was used extensively by other cultures in time like the Vikings, the Egyptians, and later by our own direct ancestors in the US for things like Belts, Sashes, Rifle Slings, as well as on the intricate level of Cloth manufacturing from Flax made into linen along the American Frontier.
Loom at Fort Boonesboro
Although we cant all practice making actual fabric or Blankets on a Loom, we can use smaller looms to make Straps, for thinks like Belts, Slings, Tump lines, Pack Straps etc...
Making a 12' Strap on a Inkle Loom
https://www.youtube.com/watch?v=vCPTWSZzpjk
The best thing about this skill is that it can be accomplished with very little tools and gear, anywhere including around the camp fire in the woods.
Making a Utility Strap with a Waist Belt style loom in the woods
Here are a few of the projects I am working on now to help me own the skill of weaving for future use

Give it a try you might find it extremely relaxing as well as enjoyable to create even more of your own gear and become that much more Self Reliant.


Friday, November 28, 2014

The Most Important Fire Tool in your Kit

I was reminded today of a Past video from the Fire School Series by Keith Burgess a very good friend and fellow woodsman who makes great study of 18th Century Living Skills and woodsman-ship. The biggest issue most of my students have when making a fire is not only in building the proper fire lay, but also the proper use of the Ferrocerium Rod. There is different techniques one can use to take the best advantage of what I consider THE most important Fire Tool-


Photos of Eastern Woodland Fire Resources

A Natural Bird Nest is always the best Bird Nest

Fat Wood is the resinous area of a Pine

Dead Weed Tops like this golden rod not only make good tinder but also great stick bundles for initial kindling

Horse Hoof Fungus ia good resource for ember creation when ground to a fine dust

Pine needles are always a good addition to any fire lay and will ignite quickly even with small flame

Pine Sap is one of the best flame extenders available

Birch Barks of any species contain volatile oils that burn fast and hot

Outer and inner barks that are fine and can be broken down like this Honeysuckle Bark are excellent additions to any tinder bundle or birds nest

Temite or Any eaten wood (Colony Wood) is usually paper thin and will smolder well for carry an ember to a new fire

Fibrous Barks like this Poplar bark are great for Bird nest construction


To find Keith's Blog and some fantastic Information please visit him at-http://woodsrunnersdiary.blogspot.com.au/


Thursday, November 27, 2014

The Most Important Primitive Skill


              Lots of folks have ask me "Dave, what do you think the most important primitive skill to be proficient at would be?" The patented answer to this from most Instructors would probably be Fire, or possibly Tool making. But I think about things in a more logical fashion and realize that some kit can easily be secured to my person and not get lost easily. A Knife strapped to my belt and a Lighter and or Ferrocerium rod in my pocket is pretty safe from loss. However the one thing most difficult to secure from loss would be a shelter! Not just a Trash sack or small painters drop cloth but a real secure shelter that will afford a good micro-climate when combined with clothing and fire or be a stand alone space to trap body warmth if fire is not an option-
              So it would be for these reasons that my answer to this question would be SHELTER building from Natural Materials is the most important skill to learn! We should understand a variety of shelter configurations that will be helpful in any environment we may be in depending on our region and hobbies. A good example comes from my 5x5 Survival Mentality in that understanding the 5 Survival Priorities of Self Aid, Shelter, Fire, Water, and Food, we combine this with 5 examples of different skills from each priority to make a well rounded system for personal self-reliance.
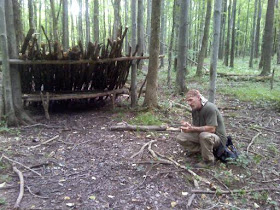
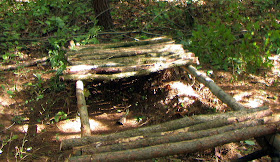
             For Shelter building I would practice 5 very practical shelters that will work in multiple season and environments. My preferred configurations would be the Debris Shelter, The Lean, the Raised Bed and Fire Backing, the Wikki-up, and the Half Face. Example of these shelters are shown below. Remember that only on Television is a large scale shelter built by one man, in single hour.. This can be a daunting task requiring a large investment of Time and Calorie expenditure. Sometimes simple is better!


Debris Huts should be tight, the ridge pole should only allow a few inches above head in the resting position, this photo is from a training session with the WV SP DEA

Adding more sticks to the outside of the debris will help keep things in place and in wind

This photo shows the outside of a single man structure. Debris should be in several layers and at least 3 feet thick for Winter use.

A simple Lean can incorporate a raised bed or one can sleep on a mat of natural debris.

Simple Tripods can be incorporated to build the raised bed structure.

Raised beds are better with cross members vertical to the frame.

Debris under the raised bed will help battle convection issues

Adding a Frame closed in on 3 sides for a Lean will help hold in heat and block wind for colder weather
Here is a Lean with a Fire Backing to help absorb heat, the long trench fire should be the length of the shelter, and the backing should be the height of the Half Face for good convection.
Long Fires with large Backing should have a cross wind to feed the fire, this will help keep smoke out of the shelter at night as well.

A Half Face can be set up 3/4 closed with wrapped sides will add sleep area for multiple hunters.

A Small Fire backing in front of the closed half face will also help direct heat to the opening of the shelter
A Wikki-up will start with a large tripod, and sticks are progressively added to enclose the shelter.
A Large Wikki will have plenty of room for a small fire inside if you leave enough opening at the top for draft. This one has a large bedding area at the back with almost a foot of ground insulation.

Nessmuk  would call this SMOOTH'EN IT!


Trapping Wisdom of the Past


I think most people fail to understand that most trappers in the older days carried few traps, Steel traps were generally hand forged and expensive. In the 1700's era the standard would have been about 4 Beaver Size Traps per Man/Horse. Later in the 1800's during the boom in Beaver trapping still 6-8 steel traps would be the norm. As trappers began to trap other fur bearing animals, they realized that steel traps being heavy as well as expensive would need to be supplemented with traps from the landscape. Trappers were experts at not only catching animals in steel traps but also experts at utilizing the local resources to improvise traps from the landscape, these skills were carried as knowledge gained not only from their native homelands in the early days, but also taught to them by the indigenous peoples of the region and  then passed on from father to son. Today we have forgotten so many of the valuable skills needed to be truly self reliant, that we must re-learn these forgotten tactics for gathering not only fur but also fair for the table. Below I will attempt to pass on some of this past knowledge to help you become more self reliant. Pictured below are examples of traps from the early 1900's 2 are considered Beaver Size or #3 and 2 of them are a bit smaller considered a #2.


Below are 5 Trap Triggers that can be made from the Landscape and scaled to be used for the particular target animal and trap set desired. Only by practicing these things in the a real life scenario can we re-learn these skills. Primitive trapping is illegal in many states but trapping by modern steel trap methods can still be practiced in some form in most states. The important thing is studying animal behavior and sign so that we can understand how to bring animals to a set and where to place our traps to be effective.


Figure 4 Trigger
Piute Dead fall Trigger


Reverse Figure 4 Trigger

L7 Trigger
Promontory Peg Trigger


Creating Sign Posts-

This step in the trapping process is not necessary if you have already found much sign and realize what you are after and what is in the area. The rationale behind a sign post is to discover what animals are frequenting an area you plan to use for trapping. To accomplish this is pretty simple. Select a good area of possible frequent travel and set a stick in the ground. Clear the ground around this area for about 2’ square so that tracks will be visible if an animal come to investigate. Once this is set up any type visual or scent attractant can be used on the stick to bring animals in. A good practice is to use both if possible examples of this may be the entrails of a frog and a feather or bright piece of cloth tied to the stick. Animals will notice things that change on their daily routes just as you would if someone moved something or placed something new in your living room. This will cause the animals to come investigate and hence leave tracks enabling to you to identify what type animals frequent the area and better cater traps and baits for those type animals.

Landscape Tracking-
Landscape tracking is the ability to understand what areas of the wilderness animals are most likely to use and why. If you think about what animals need this is the first step in the process. Animals like us need 3 things daily; they must drink, eat, and sleep. The area that provides these situations as well as travel routes to and from these areas is what landscape tracking is all about. Understanding that animals need water should tell you that concentrated water sources like ponds or water holes are key areas to both ambush prey for hunting or to trap prey if you are setting traps. Obviously water sources also provide many other game species like fish, reptiles, amphibians, and birds. Areas that provide food for the animals you seek are also good places for hunting and trapping activities. If for example you are in an area that has a lot of squirrels or chipmunks then trees providing nuts will be likely to have these animals frequenting them. It is important to understand what different species of animals eat because this will provide many clues that you can follow as stated in the last example for you to find the best areas for you hunting and trapping. Animals need to sleep so dens and lairs are always good areas to set traps or to even ambush prey if you are patient. Remember there are minimal calories spent waiting in a hide near a den or lair. Travel routes to and from the above listed areas will be great places for both trapping as well as ambushing your prey, but you must understand a bit about animal behavior to understand when these animals will travel so that the timing is correct for you hunt or for setting traps.
Edges are always a great place to trap and sometimes to hunt, an edge is an area where the landscape changes like the area of high grass and weeds just next to a field or the dry semi wet area at the side of a pond or stream. These areas are the places where game can most often be spotted during a hunt but can also be the place the animal is the most wary.
Travel Routes are the trails or highways that animals use to go from sleeping areas, to water, to food, and back. These are the prime areas to look for as animals are creatures of habit just like humans and animals traveling are less wary because they are usually on a mission to find one of the 3 needs they have. Setting traps and ambush on or just off these travel routes is one of the most effective ways to secure meat sources.
Ridges are used as much as possible by most animals so that they can maintain high ground advantage from predators as well as see their surroundings just as you would like to see yours. These areas if also incorporated as a main travel route or “Game Trail” can be the big bonanza for trapping.

Animal Sign-
Identification of animal sign is a key element of trapping and hunting it can tell you many things that when combined with landscape tracking equal great success at gathering and securing meat sources. There are seven types of animal sign we teach in the Pathfinder System and they are as follows;
Tracks-These are physical tracks left behind. Understanding what animal left these tracks and even how long ago will greatly increase your knowledge base of a potential hunting or trapping area.
Scat-As above scat that is left behind can give you great insight to what the animal is eating or even his general health.
Remains-Carcasses of dead animals can leave clues as to what animals are in the area as well as often times what predators are in the area as well. Don’t overlook the fact that remains can also provide tools needed in an emergency situation.
Refuse-This is basically things left behind by the animal like un-eaten food parts (nutshells etc. ;) these clues can help you find bait for traps as well as areas that will attract animals for trapping or hunting.
Disturbance-This type sign is usually caused by the animals activity in an area, it could be a small hole that the animal was digging in to find food, or even a chew where an animal was sharpening his teeth. The freshness of this disturbance can give you clue to how long ago animals were present in that area.
Sluf- This is some part of the animal that has been shed, sluffed, or lost. It could be hair left on a fence, a feather lost while preening, or the skin of a snake after he had shed.
Scent or Odor- This type of sign can sometimes come from a visual type sign like scat or urine but could be the scent of a Deer during rut or a skunk that was startled not long ago on a trail.
All of these signs along with Landscape tracking will help you to zero in on not only where the species are located but what they are and when they are there. These are the true keys to success when hunting and trapping. As I said this type of tracking is an art and can take years to perfect. You must go into the field and practice these skills just as you would building fire and shelter because only through trial and error will you figure out what actually works and what does not when the need arises.


Wednesday, November 26, 2014

Personal Illustrations some re-drawn for Bush Craft 101

These are some of my personal illustrations drawn before the publishing of Bush Craft 101

Ax Mask Design

Blade Profiles Traditional

Standard Blade Grinds

Notch Stick used in Pioneering Class

Basic Bedroll

Pack Strap Mod for Bedroll

Belt Ax Designs

Bow Saws

Kindling Splits with an Ax

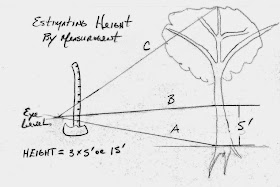
Measuring Tree Height using a measuring device

Felling Cuts

Wood Processing for Fire Wood

Leather Fishing Kit

Proper use of Forks for Cooksets


Judging Height with angles

Split Stick Rotisserie

Pack Frame

Safe Knife Grip

Safe Position for splitting with an Ax

Set the teeth on a Saw

Ax head Nomenclatures

Cooking on Stone

Splitting without an Ax

Spoon Pattern

Tarp fold for gear storage on Improvised Pack Frames

Alcohol Stove Cut Away 

Splitting a Log with Wedges